ClippyBeer
Moderator
There are many tools available for backing up your data on Windows systems. None of these will restore your system to operational status in the event of a hard disk failure. Consequently you will be burdened with the time-consuming task of manually re-installing your operating system and associated drivers/software.
This is where drive imaging eclipses data backup utilities. As the name implies, an exact image of the hard drive is created preserving not only your data but the OS and any installed components. I have used many imaging utilities over the years starting with Norton Ghost in the DOS era eventually settling on Acronis True Image for my Windows systems. The only issue is Acronis is not free so I set about searching for a reliable drive imaging software for Windows XP that was free and easier to navigate than Clonezilla.
Eventually I came across Macrium Reflect 7. It is a commercial drive imaging solution that has a free version available for home users and is compatible with Windows XP.
In this guide I will be installing Macrium Reflect free, creating recovery media, creating an image, and subsequently testing the viability of the image I created by wiping the hard drive then booting from the recovery media and restoring the image.
Target system:
Compaq Presario V2000 series laptop
XP SP3 Media Center Edition 2005
Intel Pentium M715 1.5 GHz
Dothan 90 nm
512 MB RAM DDR 133MHz
Intel 82852/82855 GM/GME graphics
55 GB ATAPI-6 Ultra DMA/100 hard drive
Conexant AC-Link Audio
Intel Pro 2200 802.11b/g WIFI
Realtek RTL8139 FastEthernet NIC
Step 1: Installation
Go to the Macrium website and install the free version:
https://www.macrium.com/reflectfree
Click on the 'Home Use' button.
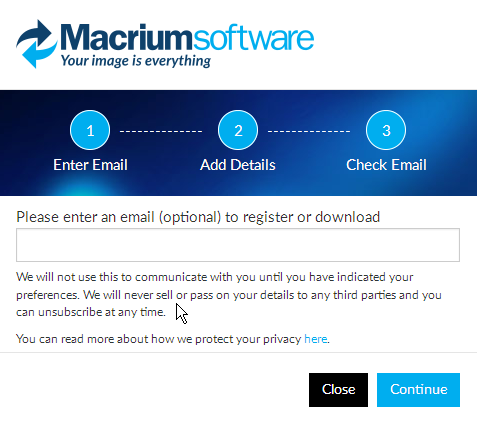
Ugh. I hate giving out my e-mail address. Fortunately you are not required to enter it - just hit 'Continue'
It will start downloading the 'ReflectDLHF.exe' file which is 5 MB in size. Please note this is not the actual installer package but rather a small stub that will download the correct version of Macrium for your system (Google Chrome works the same way).
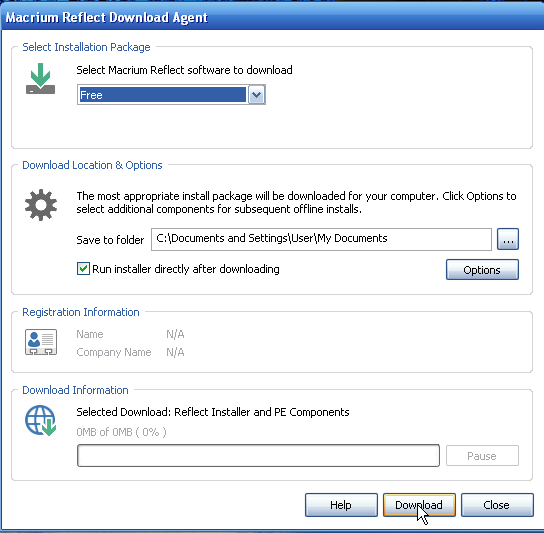
After you run the download agent be sure to select 'Free' and tick the 'Run installer directly after downloading' box. Make note of where you are downloading the installation package.
You will be asked to confirm the download of the installer and the PE components.
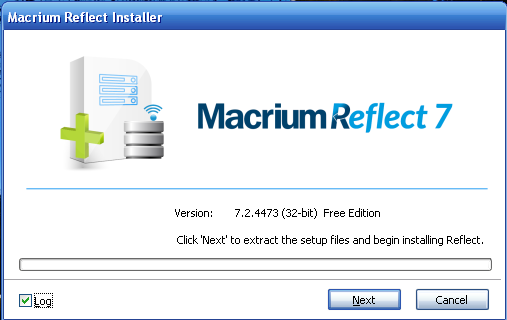
Finally the installation will start. Follow all the prompts.
Choose the home version. Registration is optional - click 'next' to skip.
Click 'Next'. Click 'Install' at the next prompt.
When the install is completed click 'Launch Now'
You will now see the main Macrium Reflect home screen.
Now would be a good time to plug in an external storage devices you plan to use for backing up to and for creating recovery media.
I have plugged in my external Toshiba hard drive and an empty 8GB flash drive.
Step 2: Rescue Media Creation
This is a critical step. Without bootable rescue media you won't be able restore your system. On the left side of the screen if you click on the 'Other Tasks' arrow it will open a sub-menu.
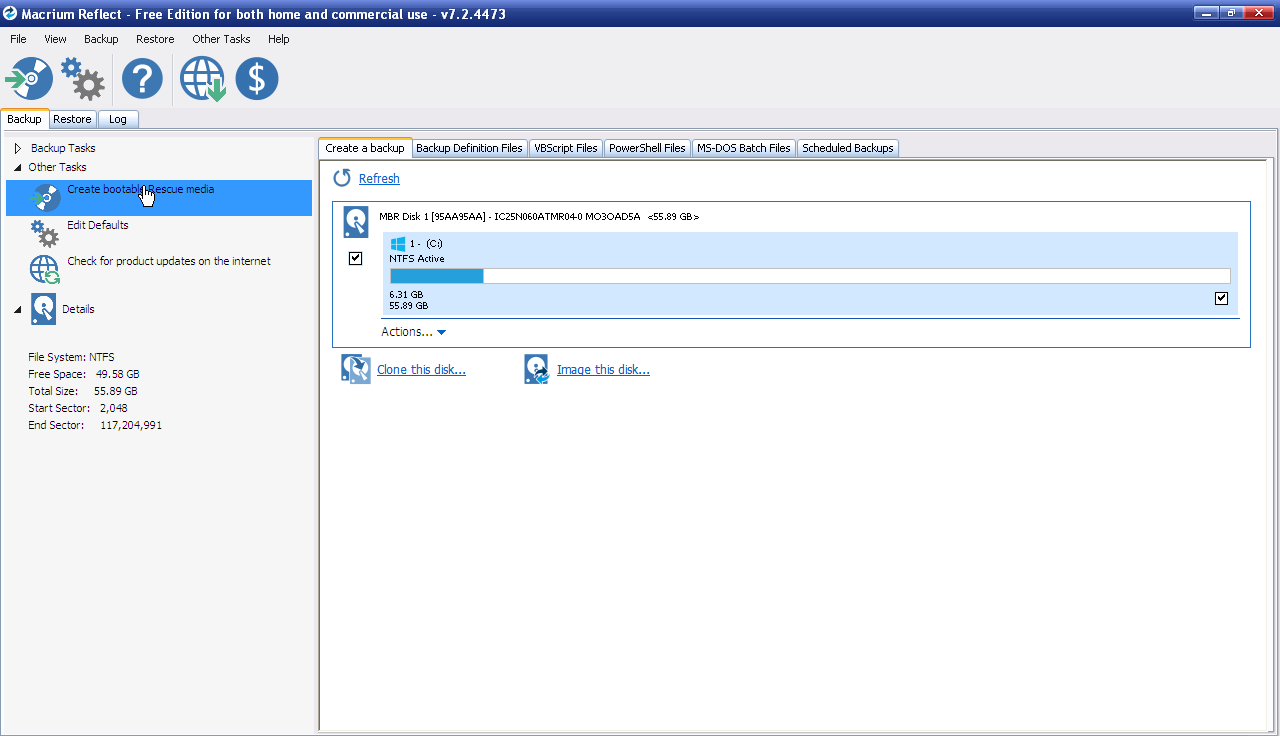
Click on 'Create bootable Rescue media'.
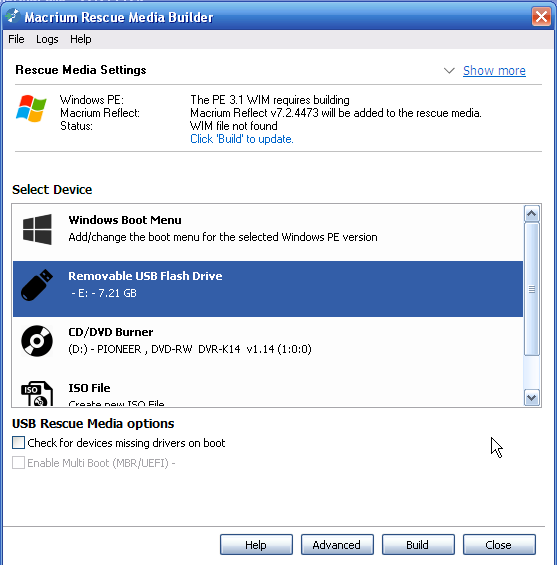
Here you have several options - If you have no experience creating bootable USB media Macrium will do it for you. It is imperative that you also create a bootable ISO file from the options and store it somewhere safe. Should you misplace the USB boot drive you just created you can re-create it from the ISO file in a worst care scenario. Those of you who are already familiar with YUMI and RUFUS can skip the USB rescue media creation and go right to ISO rescue media.
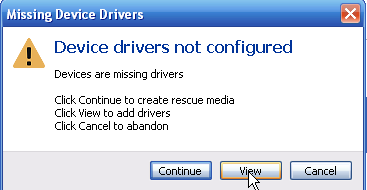
I received this prompt when creating both USB and ISO rescue media - I hit 'view' and it prompted me for a location of missing drivers. I don't have any missing drivers in Device Manager so I wasn't sure what it was asking for.
I clicked on 'Continue' instead it began the process of building the rescue media.
Once it's completed the drive imaging process can begin.
Step 3: Creating an image of your hard drive
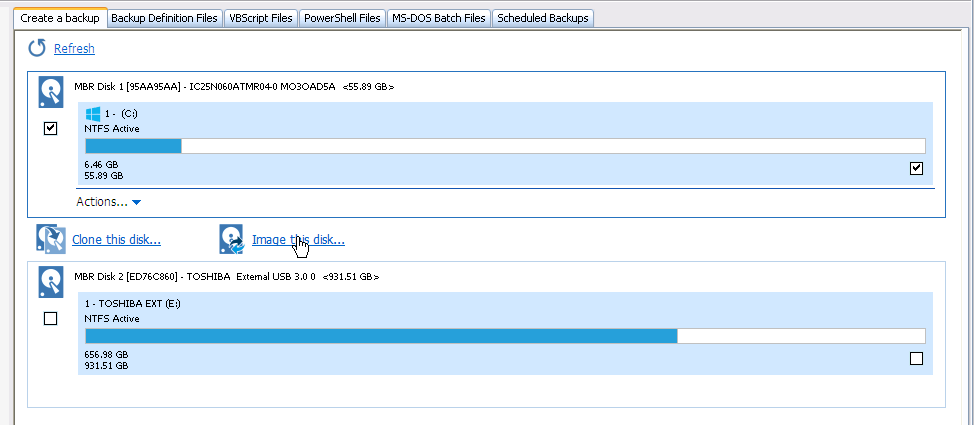
The source drive should be on top, the destination on the bottom. You may have to hit the Refresh button to show your connected drives. The box on the left should be ticked - this means you are selecting the entire hard drive to image. The drive you are imaging to needs to have enough free space to hold the image. The size of the image is based on the size of occupied space. In my example my 55GB hard drive only 6.46 GB is used. This means that my image file will be at least 6.46 GB in size varying upon the level of compression used. I'll use the defaults and see what kind of speed/compression I get.
Click on 'Image this disk....'
Click on 'Folder' and select where you want the image file to be placed.
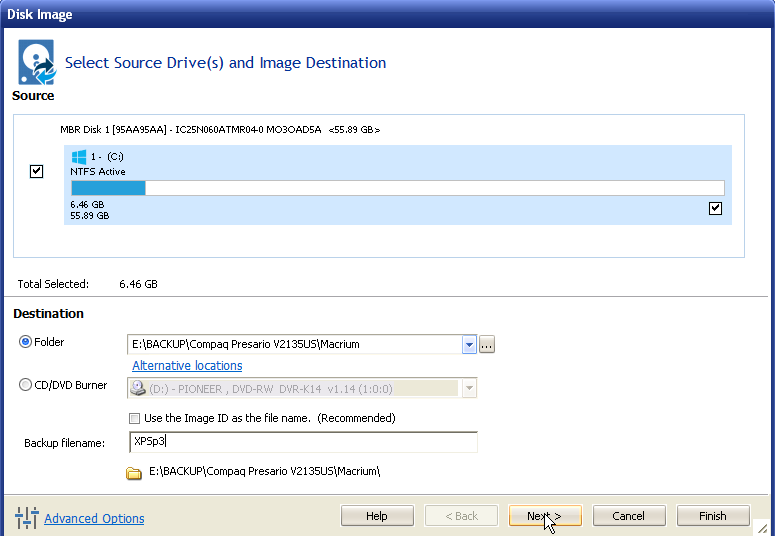
Choose the filename - I just entered a quick name but you should use a naming convention which includes the date i.e., XP-15-Oct-2019. Once you start making frequent image backups it will make deleting uneeded images that much easier. Click on 'Next'.
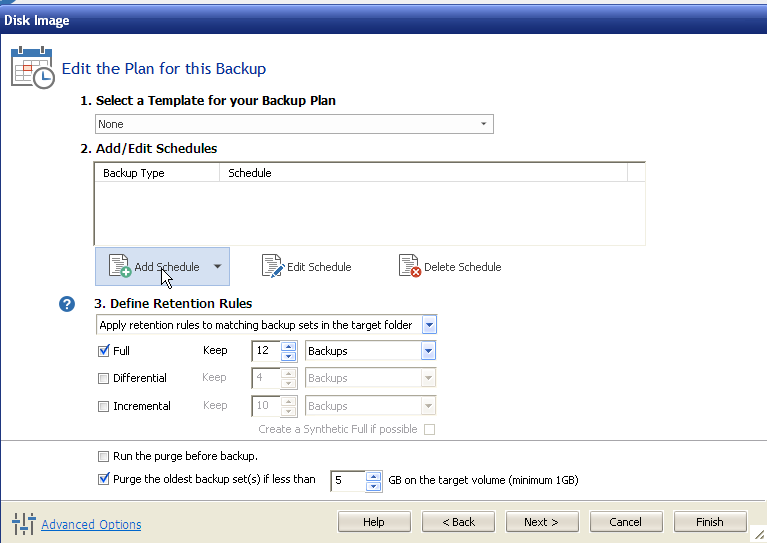
Tick the box labeled 'Full' then click on 'Add Schedule'
Tick the 'One Time Only' then click 'OK'
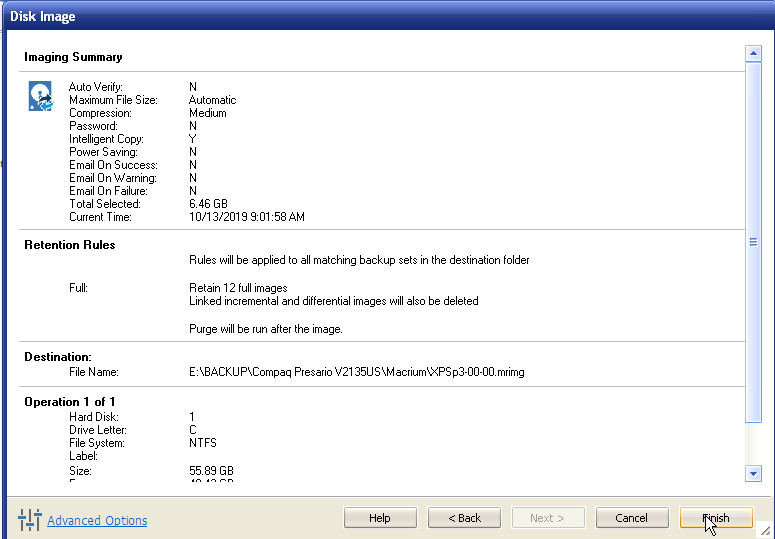
You will be presented with the summary screen. Click 'Finish'. and you will be asked to save the backup options / run the backup. Click 'OK' and the imaging process will start.
You will be asked to save the backup options / run the backup. Click 'OK' and the imaging process will start.
It will update the screen a few times - backup time varies with the amount of data and speed of your computer.
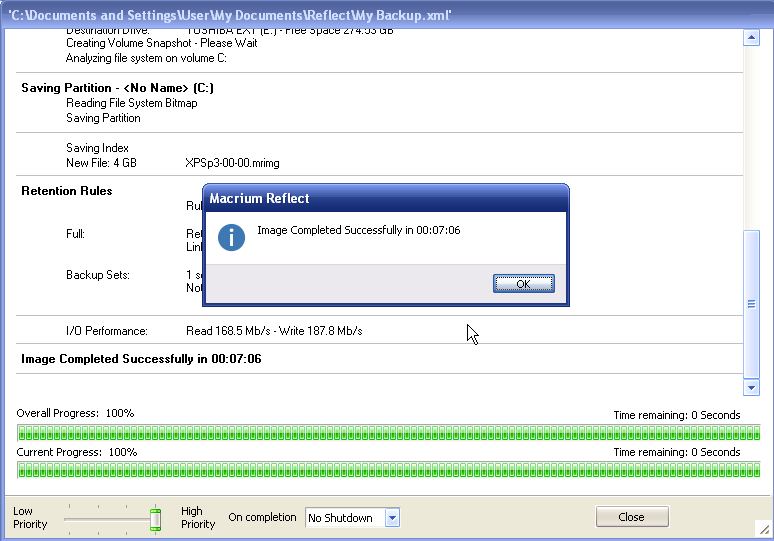
The image is creation is complete!
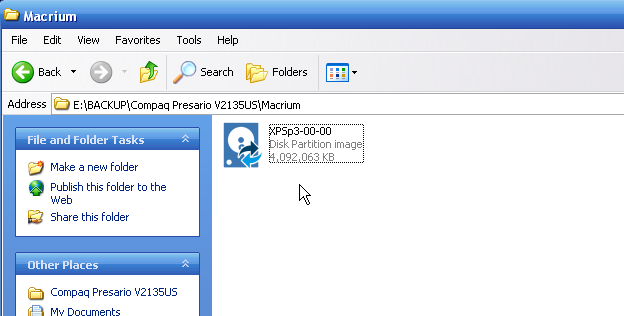
The resultant image size is about 4 GB with the default settings. I could have probably gotten a smaller size had I set the compression higher in settings but that would require more CPU usage thus slowing down the image creation process. This PC is slow enough but you can try it yourself if you have a higher spec PC than this.
With the image creation process complete there is one final critical phase. Ensuring your rescue media was created successfully and is able to access the image you just created.
Step 4: Booting with the rescue media
All PCs have diifferent methods of selecting which storage device to boot from - you will usually see a screen that asks you to press a certain key sequence to choose which device to boot from. You will have to determine this for your PC as it varies by make and model.
It will take a few minutes to load but eventually you'll see a desktop screen and may be prompted to load additional drivers.
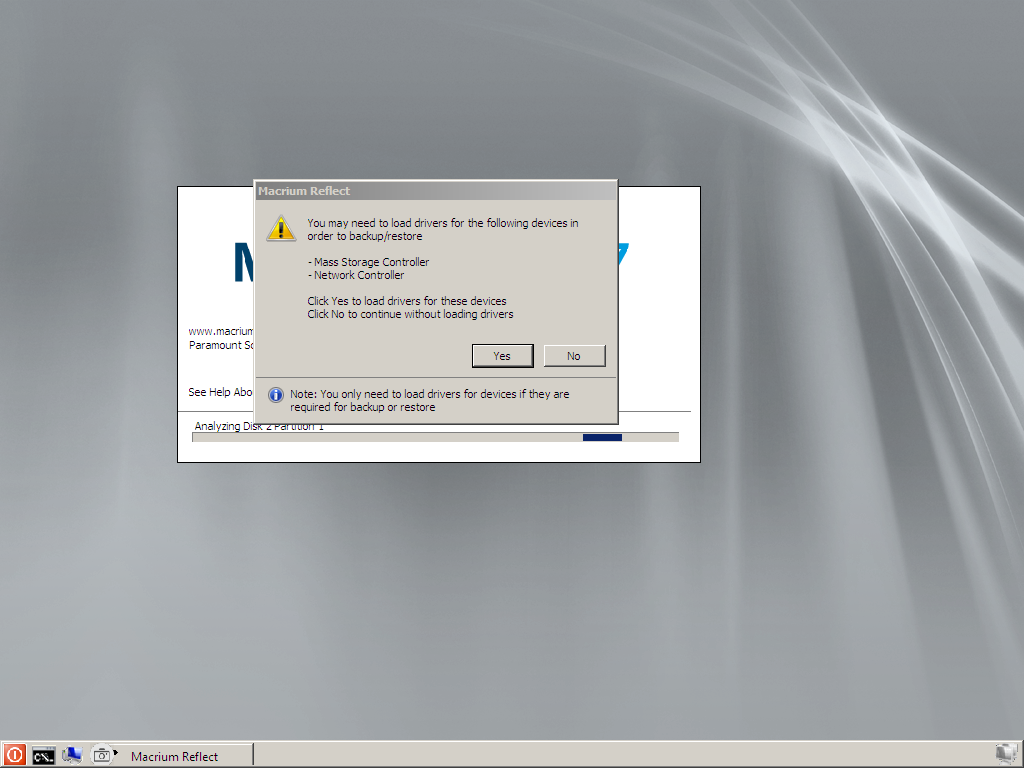
Just click 'No' and the Macrium Reflect main screen will open.
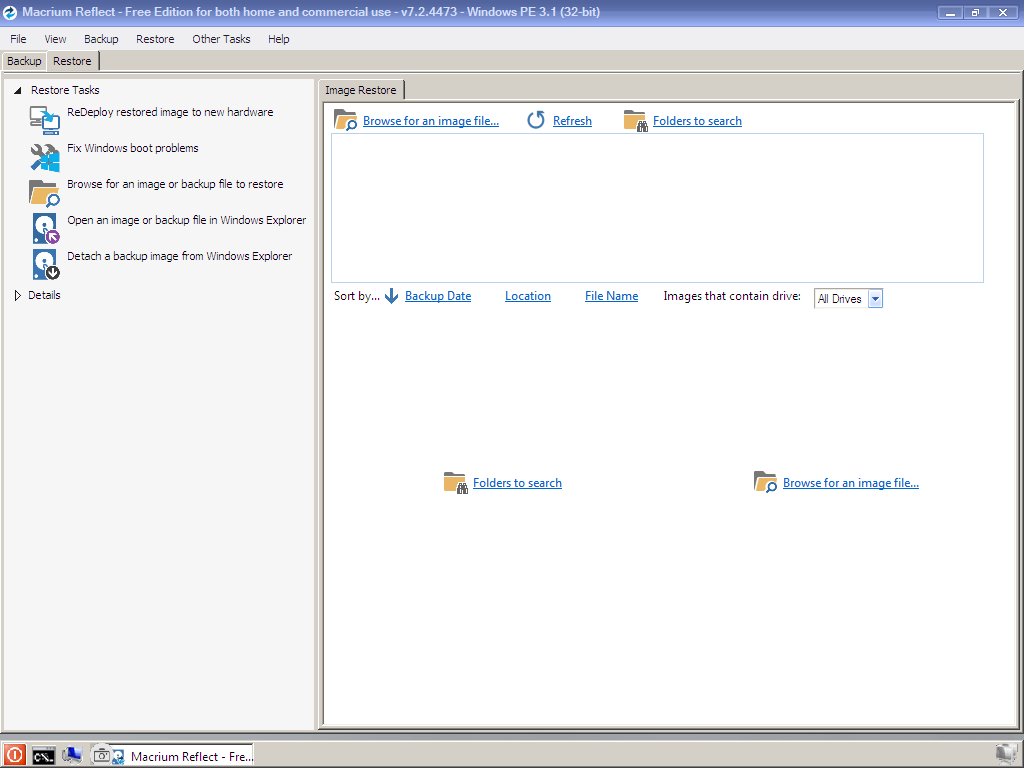
Select the Restore tab on the top left then choose 'Browse for an image file...'
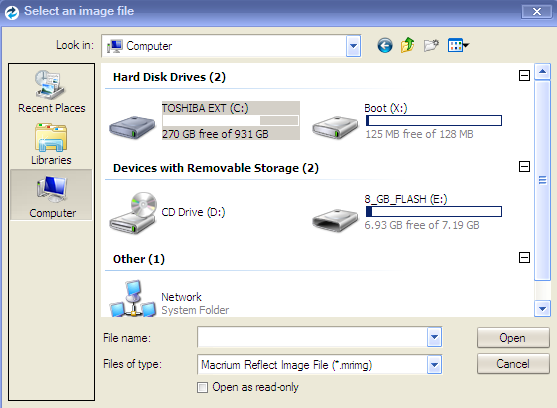
If you are able to browse for your image file after booting the rescue media you are ready to restore.
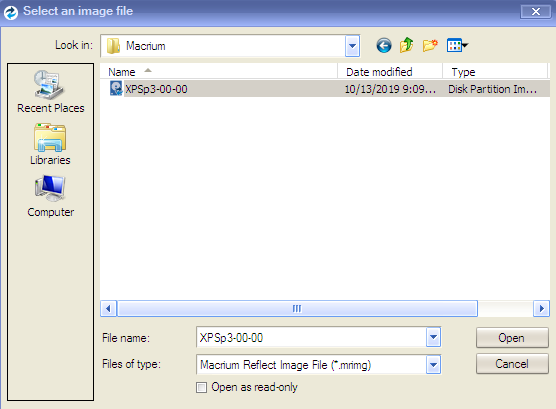
I wanted to test Macrium's restore capability so I wiped my hard drive using Acronis' Drive Cleanser - it overwrites every sector of the hard drive removing any traces. My system is now unbootable with a blank hard drive. Now it's time to restore. After selecting my image file you will see this next screen.
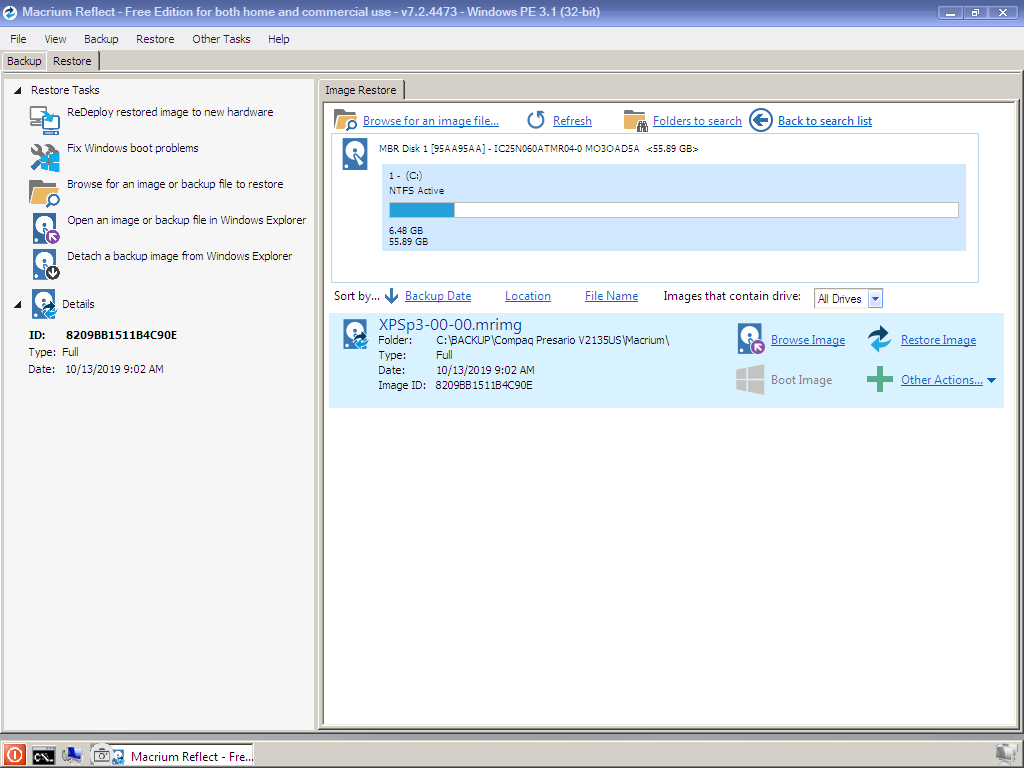
Now you click on 'Restore Image' on the middle right of the screen.
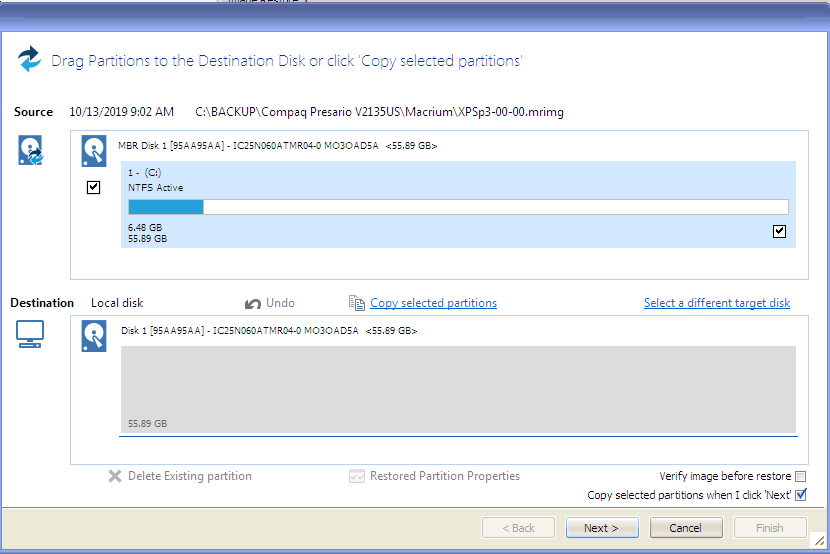
Select the destination disk and hit 'Next>'.
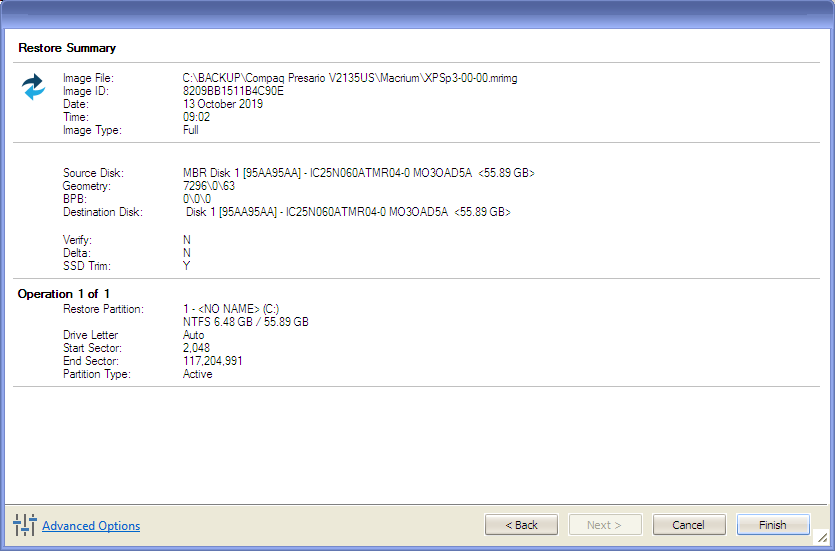
You will be presented with the summary screen. Confirm your selections and hit 'Finish'
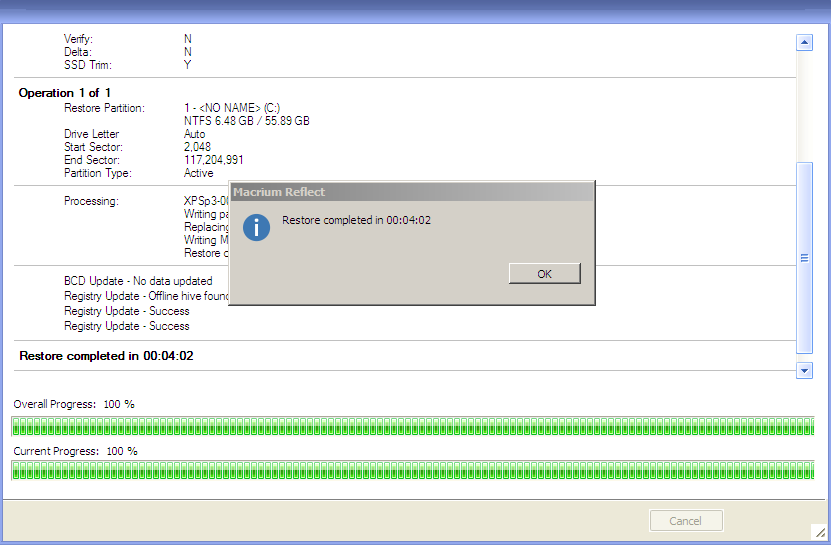
The restore time will vary of course depending on the size of the image file and speed of PC.
I click on the button in the bottom left corner and select 'reboot'. I unplug all USB drives.
Windows XP loads normally, in the exact same state it was when I created the image. Yes, Macrium can be used to restore XP. Please note you don't have to install Macrium on all your systems. Once you have the rescue media you can use that to backup and restore. The advantage to installing is you can image your system while it's active. no rebooting necessary.
My strategy is as follows - if I do a major update to my system, if an app takes a long time to install and then requires large updates I create an image. In many cases restioring an image is much quicker than having to re-install a piece of software and updates/extras required.
I prefer doing full images rather than incremental/differential. It's easier when you need to remove uneeded backups - just delete the image files you don't need.
I realize some of you have never imaged your system before and it may seem daunting at firsr. Like anything else, it's a learning process. You had to learn how to use Windows, Office, etc. The time you spend learning drive imaging will be time saved when you successfully restiore from image. This is especially true of legacy OSes such as XP where long dead links to driver files and evenually updates may prevent you from doing a clean install.
Be sure you keep the 3 Macrium files in a safe place:
the setup program that was downloaded - v7.2.4473_reflect_setup_free_x86.exe (93.6 MB), pe3x86.zip (117 MB - this is the portable environment component for creating rescue media) and MacriumRescue.iso (141 MB - the rescue media itself). Macrium, like so many other software developers, may one day decide to stop supporting XP and remove the diownloads from their site.
Macrium is just one of many drive imaging solutions for Windows - I'm still going to use my trusty Acronis True Image but it's good to have options. Whichever one you choose frequent drive imaging is a good disaster recover policy.
Drive imaging = peace of mind.
This is where drive imaging eclipses data backup utilities. As the name implies, an exact image of the hard drive is created preserving not only your data but the OS and any installed components. I have used many imaging utilities over the years starting with Norton Ghost in the DOS era eventually settling on Acronis True Image for my Windows systems. The only issue is Acronis is not free so I set about searching for a reliable drive imaging software for Windows XP that was free and easier to navigate than Clonezilla.
Eventually I came across Macrium Reflect 7. It is a commercial drive imaging solution that has a free version available for home users and is compatible with Windows XP.
In this guide I will be installing Macrium Reflect free, creating recovery media, creating an image, and subsequently testing the viability of the image I created by wiping the hard drive then booting from the recovery media and restoring the image.
Target system:
Compaq Presario V2000 series laptop
XP SP3 Media Center Edition 2005
Intel Pentium M715 1.5 GHz
Dothan 90 nm
512 MB RAM DDR 133MHz
Intel 82852/82855 GM/GME graphics
55 GB ATAPI-6 Ultra DMA/100 hard drive
Conexant AC-Link Audio
Intel Pro 2200 802.11b/g WIFI
Realtek RTL8139 FastEthernet NIC
Step 1: Installation
Go to the Macrium website and install the free version:
https://www.macrium.com/reflectfree
Click on the 'Home Use' button.
Ugh. I hate giving out my e-mail address. Fortunately you are not required to enter it - just hit 'Continue'
It will start downloading the 'ReflectDLHF.exe' file which is 5 MB in size. Please note this is not the actual installer package but rather a small stub that will download the correct version of Macrium for your system (Google Chrome works the same way).
After you run the download agent be sure to select 'Free' and tick the 'Run installer directly after downloading' box. Make note of where you are downloading the installation package.
You will be asked to confirm the download of the installer and the PE components.
Finally the installation will start. Follow all the prompts.
Choose the home version. Registration is optional - click 'next' to skip.
Click 'Next'. Click 'Install' at the next prompt.
When the install is completed click 'Launch Now'
You will now see the main Macrium Reflect home screen.
Now would be a good time to plug in an external storage devices you plan to use for backing up to and for creating recovery media.
I have plugged in my external Toshiba hard drive and an empty 8GB flash drive.
Step 2: Rescue Media Creation
This is a critical step. Without bootable rescue media you won't be able restore your system. On the left side of the screen if you click on the 'Other Tasks' arrow it will open a sub-menu.
Click on 'Create bootable Rescue media'.
Here you have several options - If you have no experience creating bootable USB media Macrium will do it for you. It is imperative that you also create a bootable ISO file from the options and store it somewhere safe. Should you misplace the USB boot drive you just created you can re-create it from the ISO file in a worst care scenario. Those of you who are already familiar with YUMI and RUFUS can skip the USB rescue media creation and go right to ISO rescue media.
I received this prompt when creating both USB and ISO rescue media - I hit 'view' and it prompted me for a location of missing drivers. I don't have any missing drivers in Device Manager so I wasn't sure what it was asking for.
I clicked on 'Continue' instead it began the process of building the rescue media.
Once it's completed the drive imaging process can begin.
Step 3: Creating an image of your hard drive
The source drive should be on top, the destination on the bottom. You may have to hit the Refresh button to show your connected drives. The box on the left should be ticked - this means you are selecting the entire hard drive to image. The drive you are imaging to needs to have enough free space to hold the image. The size of the image is based on the size of occupied space. In my example my 55GB hard drive only 6.46 GB is used. This means that my image file will be at least 6.46 GB in size varying upon the level of compression used. I'll use the defaults and see what kind of speed/compression I get.
Click on 'Image this disk....'
Click on 'Folder' and select where you want the image file to be placed.
Choose the filename - I just entered a quick name but you should use a naming convention which includes the date i.e., XP-15-Oct-2019. Once you start making frequent image backups it will make deleting uneeded images that much easier. Click on 'Next'.
Tick the box labeled 'Full' then click on 'Add Schedule'
Tick the 'One Time Only' then click 'OK'
You will be presented with the summary screen. Click 'Finish'. and you will be asked to save the backup options / run the backup. Click 'OK' and the imaging process will start.
You will be asked to save the backup options / run the backup. Click 'OK' and the imaging process will start.
It will update the screen a few times - backup time varies with the amount of data and speed of your computer.
The image is creation is complete!
The resultant image size is about 4 GB with the default settings. I could have probably gotten a smaller size had I set the compression higher in settings but that would require more CPU usage thus slowing down the image creation process. This PC is slow enough but you can try it yourself if you have a higher spec PC than this.
With the image creation process complete there is one final critical phase. Ensuring your rescue media was created successfully and is able to access the image you just created.
Step 4: Booting with the rescue media
All PCs have diifferent methods of selecting which storage device to boot from - you will usually see a screen that asks you to press a certain key sequence to choose which device to boot from. You will have to determine this for your PC as it varies by make and model.
It will take a few minutes to load but eventually you'll see a desktop screen and may be prompted to load additional drivers.
Just click 'No' and the Macrium Reflect main screen will open.
Select the Restore tab on the top left then choose 'Browse for an image file...'
If you are able to browse for your image file after booting the rescue media you are ready to restore.
I wanted to test Macrium's restore capability so I wiped my hard drive using Acronis' Drive Cleanser - it overwrites every sector of the hard drive removing any traces. My system is now unbootable with a blank hard drive. Now it's time to restore. After selecting my image file you will see this next screen.
Now you click on 'Restore Image' on the middle right of the screen.
Select the destination disk and hit 'Next>'.
You will be presented with the summary screen. Confirm your selections and hit 'Finish'
The restore time will vary of course depending on the size of the image file and speed of PC.
I click on the button in the bottom left corner and select 'reboot'. I unplug all USB drives.
Windows XP loads normally, in the exact same state it was when I created the image. Yes, Macrium can be used to restore XP. Please note you don't have to install Macrium on all your systems. Once you have the rescue media you can use that to backup and restore. The advantage to installing is you can image your system while it's active. no rebooting necessary.
My strategy is as follows - if I do a major update to my system, if an app takes a long time to install and then requires large updates I create an image. In many cases restioring an image is much quicker than having to re-install a piece of software and updates/extras required.
I prefer doing full images rather than incremental/differential. It's easier when you need to remove uneeded backups - just delete the image files you don't need.
I realize some of you have never imaged your system before and it may seem daunting at firsr. Like anything else, it's a learning process. You had to learn how to use Windows, Office, etc. The time you spend learning drive imaging will be time saved when you successfully restiore from image. This is especially true of legacy OSes such as XP where long dead links to driver files and evenually updates may prevent you from doing a clean install.
Be sure you keep the 3 Macrium files in a safe place:
the setup program that was downloaded - v7.2.4473_reflect_setup_free_x86.exe (93.6 MB), pe3x86.zip (117 MB - this is the portable environment component for creating rescue media) and MacriumRescue.iso (141 MB - the rescue media itself). Macrium, like so many other software developers, may one day decide to stop supporting XP and remove the diownloads from their site.
Macrium is just one of many drive imaging solutions for Windows - I'm still going to use my trusty Acronis True Image but it's good to have options. Whichever one you choose frequent drive imaging is a good disaster recover policy.
Drive imaging = peace of mind.
") , Thanks for your guide
, Thanks for your guide